Tail Lights
In their infinite wisdom Kawasaki chose not to put anything in the two outer pods of the tail-light assembly on US imported 3rd generation Ninja 250s. The center pod has a dual filament bulb with low power for running lights and high power for brake lights. To increase conspicuity you can duplicate this in the outer pods, giving you much larger brake and running lights. In addition, if your main tail-light bulb ever burns out, you still have lighting from the side pods. You don't want to be riding a bike without tail and brake lights, especially if you have someone driving behind you!
Some people move the turn signals into the outer pods, but this isn't really a great idea. First it's illegal. Federal regulation demand at least a minimum distance between turn signals and the outer two pods of the Ninja 250's tail light assembly aren't far enough apart to meet the requirements. Almost, but not quite. While it's unlikely you'll get a ticket, it's possible you could. The second reason why turn signals in the pods isn't a great idea is that (a) they are very close to the bright brake light and (b) don't stick out very far from the centerline of the bike, both of which can be confusing to car drivers (who often aren't very attentive to motorcycles). That's why the Feds want them further apart.
So if you want to put turn signals in there, it's up to you, but I would not really recommend it.
When it comes to adding running lights and turn signals it's a good idea to use LED bulbs. They draw a lot less power then tungsten filament bulbs so load the battery and alternator less, plus they very rarely burn out. While (again) there are federal and state regulation against using LEDs in some vehicle lighting applications, these are just auxiliary lights. You keep your DOT legal brake and tail lights lit by a tungsten filament bulb. If you use regular bulbs you'll be adding an extra 54W load to the electrical system when you have the brakes on and an extra 16W load with just the tail lights. LED lights might add only 1 or 2W.
Kawasaki were kind enough to put a hole for a bulb in the outer pods, just no bulb holder or wiring. You can find bulb holders at most auto parts stores. They probably won't fit directly into the holes that Kawasaki provide, but with a saw, file and tube of epoxy glue it's not that difficult to get them mounted! If you want both running lights and brake lights you want the sockets for two filament bulbs (type 1157). Typical cost is $3-$5 each. You also want LED based type 1157 bulbs. Again they'll cost you a few dollars each. Since the lenses on the outer pods are red, you can use while, red or amber LEDs, but the white ones are usually brighter. The cheaspest place to find them is on eBay.
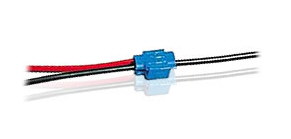
Wiring tap. The red wire connects to the black wire without cutting into it.
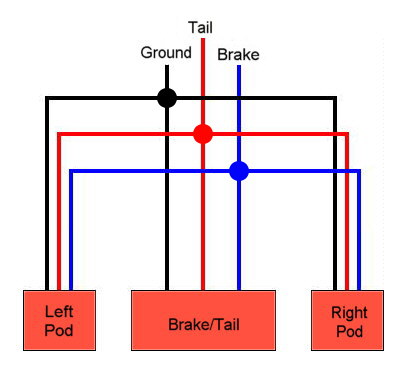
Wiring the bulbs is quite easy. There are three wires going to the tail/brake light. The black/yellow wire is the ground, the blue wire is the brake light and the red wire is the tail light. The sockets may have only two wires (one for brake, one for tail) so you may have to solder a wire to the metal socket for the ground. You can then splice the wires from the sockets into the existing tail/brake light wiring. To do this you can either cut the wires and solder the connections together or you can use automobile type splicing blocks which allow you to tap into a wire without cutting it. You can find these at Home Depot, Radio Shack or most auto parts stores.
On the sockets I used, both connecting wires were black, so you may have to experiment to see which one lights the bulb brighter (this is the brake light connection) and which lights the bulb dimmer (this is the tail light connection).
The total cost of the project will be in the $15-$20 region and it probably takes around an hour once you get started.