Gearing
While the Ninja 250 is a high reving bike and while it will run all day at 10,000+ rpm, many riders prefer to cruise at lower rpms. It probably does strain the engine less and the Ninja 250 is know to use oil when run for long periods above 9000 rpm.
The simplest way to lower the revs at any given speed is by changing the front sprocket from the standard 14 tooth sprocket to a 15-tooth sprocket. This lowers the rpm at any given speed by about 7%. That's not enough to make acceleration noticeably slower but it is enough to drop the engine revs when riding on the highway.
With the standard tires and the standard 14 tooth front sprocket and 45 tooth rear sprocket at 70mph the engine is turning at around 8900 rpm. With a 15 tooth front sprocket installed, this drops to 8300 rpm. A small but significant change.
The good thing about a front sprocket change is that it's cheap and it's easy to do. A new front sprocket will cost under $20 and changing it takes only around an hour. 30 minutes if you're a reasonably experienced mechanic and none of the bolts are stuck!
The removal/replacement sequence is as follows ('86-'07 models):
- Remove the front sprocket cover
- Remove the locking pin from the rear axle nut
- Loosen the rear axle nut
- If you haven't done so already, put the bike on the center stand or otherwise raise the rear wheel off the ground.
- Slacken the chain adjuster bolts and push the rear wheel forward to take tension off the chain. Don't push the bike off the center stand!
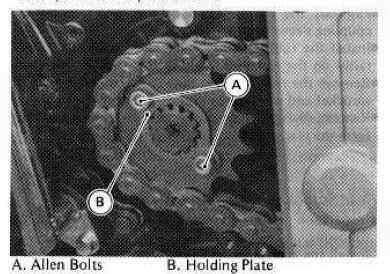
- Loosen the two bolts which hold the front sprocket holding plate on
- Remove the front sprocket from it's splined shaft and slip it out of the chain.
- Put the 15 tooth sprocket in the chain and slip it onto the splined shaft
- Replace the sprocket holder plate, bolts and tighten to the specified torque. This is only 7.2 ft.lbs so don't tighten them too much. If you shear off the bolts, you won't be the first (or last) person to do it.
- Replace the front sprocket cover
- Pull the rear wheel back and use the adjuster bolts to get the correct chain tension
- Tighten the rear axle nut (81 ft-lbs) and replace the locking pin.
Note that the front sprocket will wobble very slightly. This is normal and it's designed that way for longer life and easier replacement. It's called a "floating sprocket" and provides a means for the chain and sprocket to self align.
If you want an even larger drop in rpm (in exchange for somewhat slower acceleration) the next step would be to change the stock 45 tooth rear sprocket for a 44 tooth or even a 42 tooth sprocket. As long as you do a lot of highway commuting and don't live in a hilly area the larger rear sprockets can be fine. Rear sprockets are a little more expensive and a take a little longer to change so the first step is definitely the 15 tooth front. Don't be tempted to go to a 16 tooth front sprocket though. They do exist but there can be problems with clearance between the larger sprocket and the front sprocket cover.